The Live Logger Data feature can be used to automatically calculate water levels at monitored wells based on Level Logger(s) and Baro Logger(s) readings.
Principle of Water Level Measurement with Level Loggers and Baro Loggers
"Leveloggers (L) measure the total pressure acting on a transducer at their zero point/sensor. The total pressure is caused by the column of water lying above the Levelogger pressure sensor AND the barometric (atmospheric) pressure acting on the water surface. To compensate for barometric pressure fluctuations and get true height of water column measurements (H), a Barologger (B) is required."
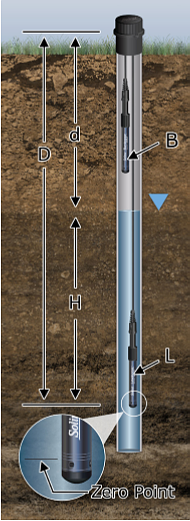
Equation:
Levelogger Reading (L) — Barologger Reading (B) = Height of Water Column (H)
Note: "Levelogger is rated for a specific submergence depth. The choice of model largely depends on the accuracy of the water level required and the submergence depth. The selection is based on the maximum anticipated water level fluctuation."
Transducer Field Data Collection EDGE Workflow
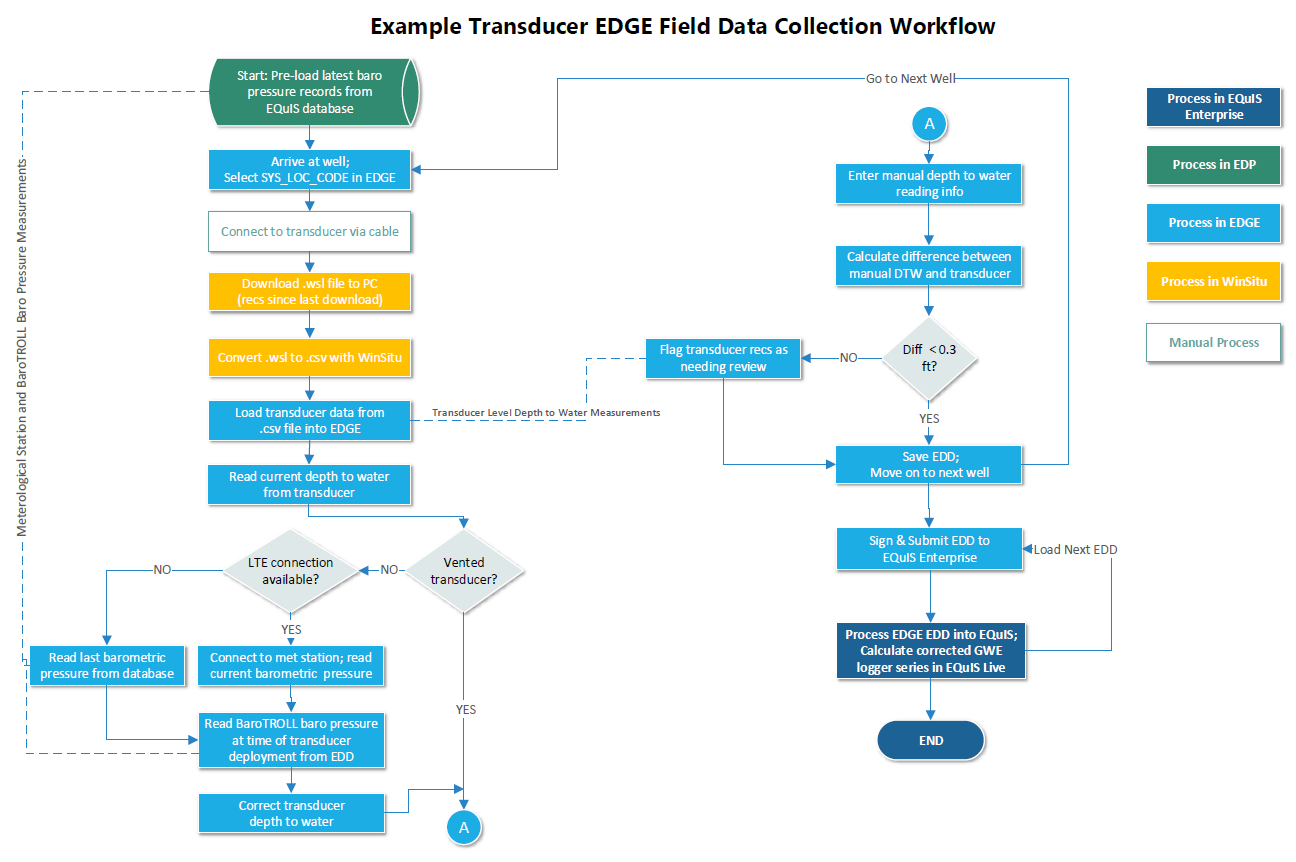
The following diagram illustrates an example workflow that includes the barometric pressure data stored in the database, EDGE field data collection, and the submission of collected data into EQuIS.
EDGE Workflow
Step 1. EDGE – Preload the Baro Loggers
(Start: Preload latest barometric pressure records from database as in figure above)
Note: This action is performed every time, for each field event. |
1.Select the Devices ribbon.
2.Select the instrument to be used (e.g., In-Situ_Level500).
3.Click Open File.
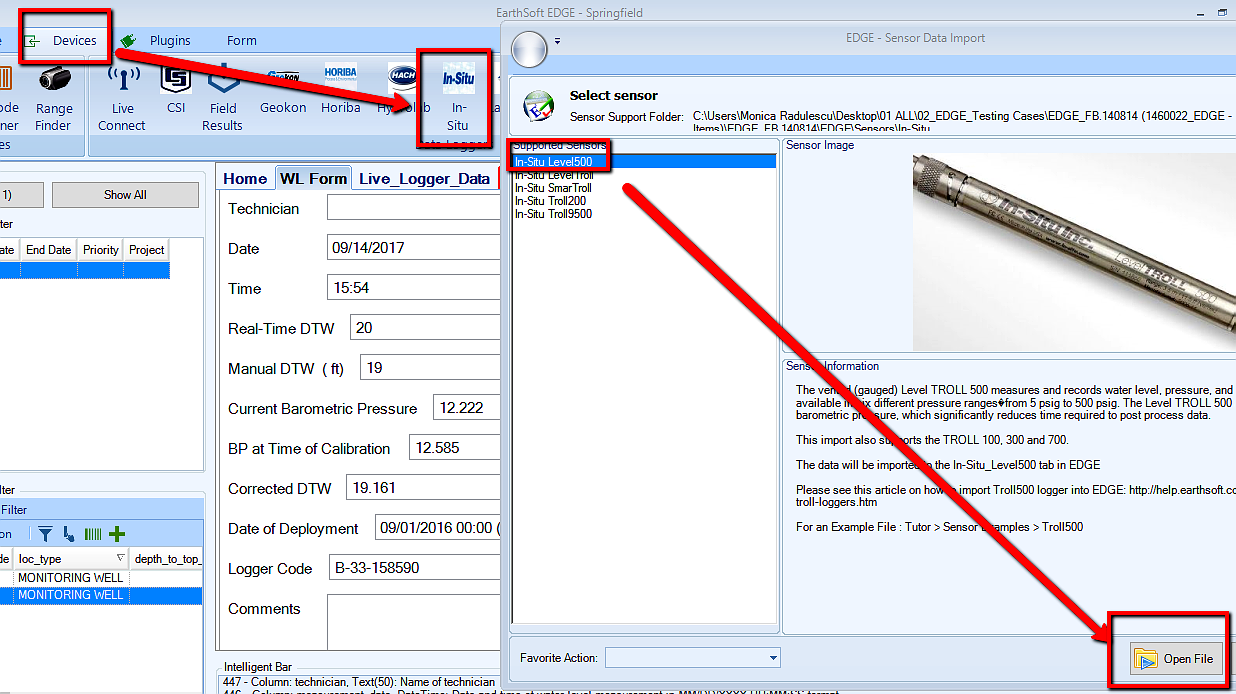
4.Select the appropriate file containing the Baro Logger data (e.g., Barologger.csv, see below).
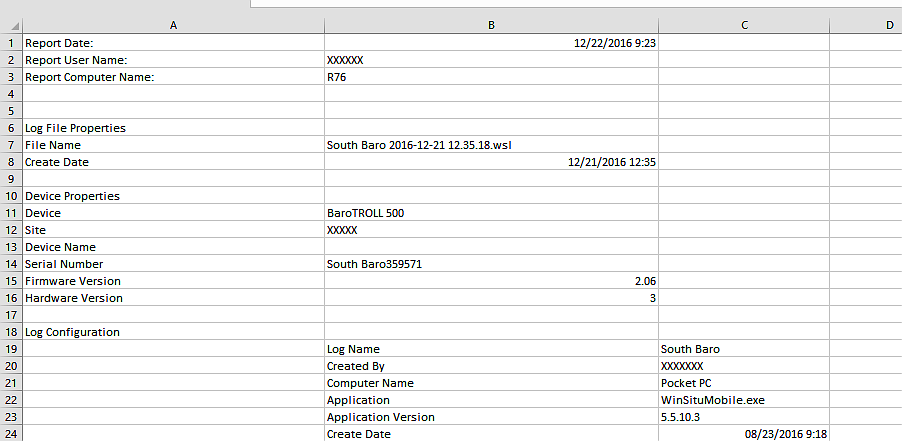
5.Save the EDD (e.g., EDD_loggerloc1.xlsx).
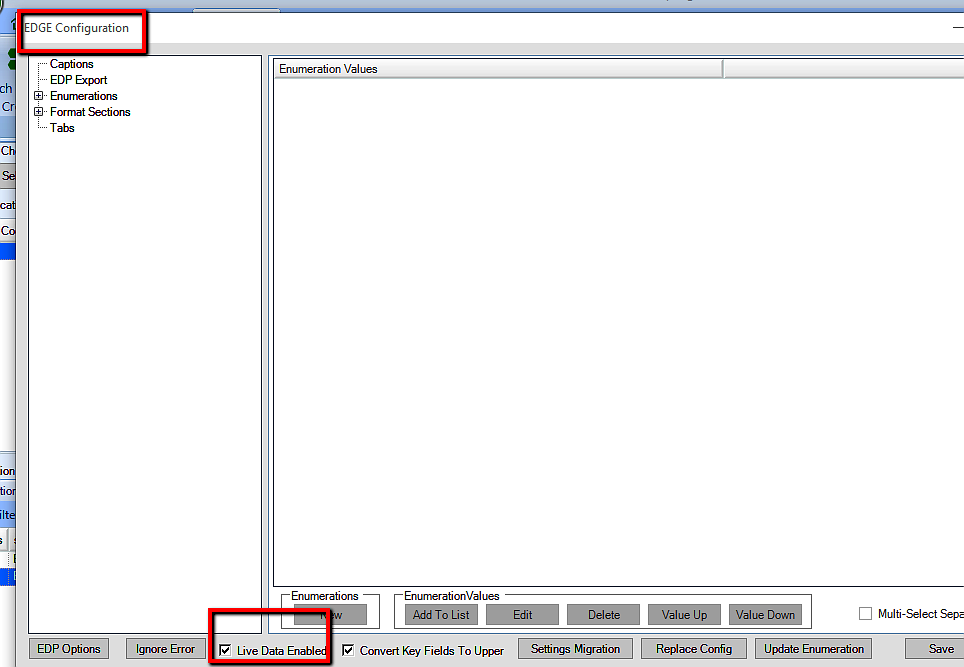
Note: Make sure Live Data is enabled in EDGE Configuration. |
Step 2. Create EDGE Field EDD Report in EQuIS
Note: This action is performed every time, for each field event. |
1.Open EDP from the Professional Home ribbon.
2.Open the format pertinent to the build with the Live Logger.
3.Load the EDD created during Step 1 (e.g., EDD_loggerloc1.xlsx).
4.Create and then Commit the EDD package.
5.The data will be uploaded to EQuIS.
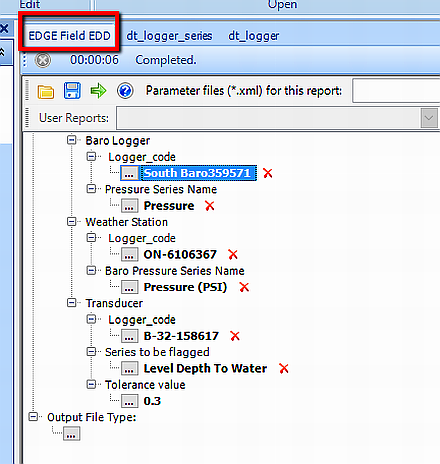
6.Ensure that the EDGE Field EDD Report library file is available (e.g., EarthSoft.Reports.Library.40338.dll).
7.Create the EDGE Field EDD user report and Save report as EDD_Report... (e.g., EDGE_Report_12345.xlsx).
Step 3. Configuring EDGE
Note: Step 3 is performed just once; the first time while configuring EDGE. |
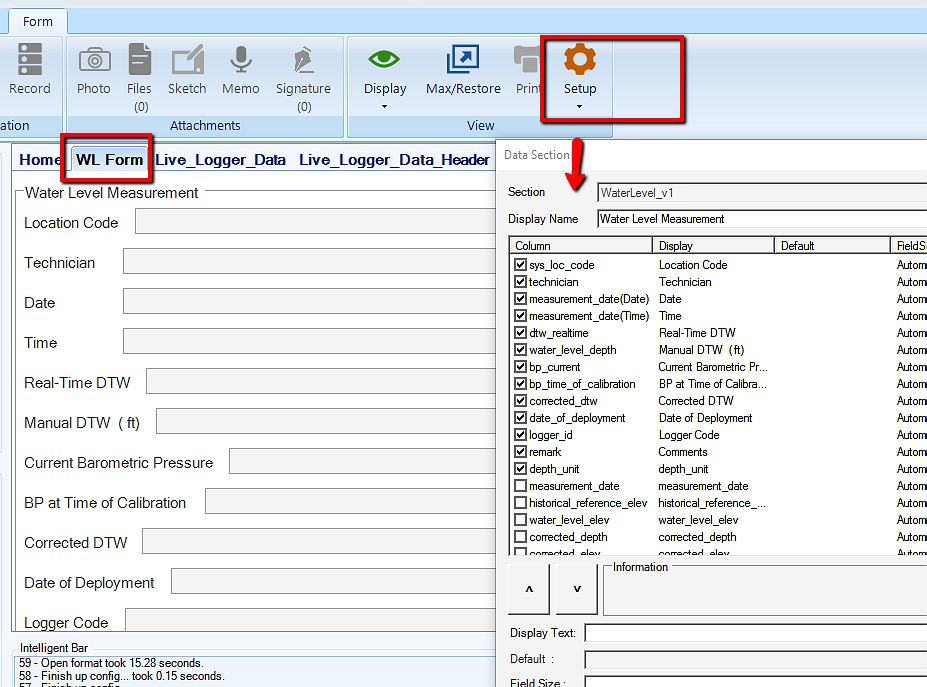
The necessary EDGE configuration is displayed below.
To configure EDGE:
•Select the Plugins ribbon and check the necessary forms. Click Save and Close.
•Click the EDGE application icon (top left) and select Show/Hide Tabs.
•Select the necessary forms to be shown and uncheck any unnecessary forms. Click Ok.
•On the WL Form, select Setup on the Form ribbon and check the fields shown in the figure above.
•There are several enumerations to take note of: baroTimeOffset and live_connect_address.
•The baroTimeOffset enumeration needs to match the proper date to be able to collect the most recent barometric pressure readings from the Weather Station.
•The default time setting is 3 hours, but can be set to a maximum of 999 hours. Changing the hours allows the user to expand or minimize the search range for current barometric data but the most current data will always be selected.
•The hours value checks for data within a ± range (e.g., ±3 hours = 6 hour overall range).
•Under the live_connect_address enumeration, enter the web address required to connect to the weather station to receive the latest barometric pressure data.
•For further help with configuration and enumerations please refer to the Configuration and Enumerations article.
Step 4. Live Connect
Note: This action is performed every time, for each field event. |
1.Select the Devices ribbon.
2.Load logger files.
3.Click Live Connect from the Devices ribbon.
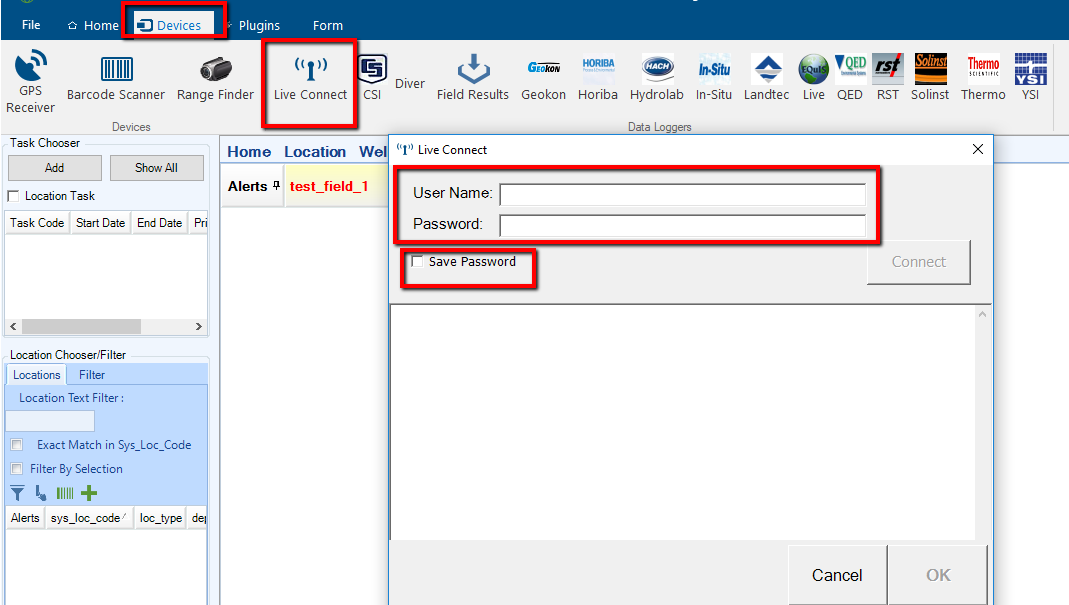
4.In the Live Connect dialog window, enter User Name and Password. The password may also be saved to the EDGE build (encrypted).
5.If the user is connected to the internet, real-time barometric data is received from the weather station selected in the report.

Square Brackets
Note: If the file name including location has square/parenthesis brackets (e.g., [B-33] 2020-01-01.wsl.csv), SYS_LOC_CODE comes from the file name and the log name (B-33 random in Figure above) is ignored.
If the file name including location does not have square/parenthesis brackets (e.g., B-32 2020-01-01.wsl.csv), SYS_LOC_CODE comes from the log name. |
Step 5. Calculation in the WL Form (work within EDGE)
Note: This action is performed every time, for each field event. |
1.Load the EDD report created in Step 2 (e.g., EDGE_Report_12345.xlsx).
2.Load the Logger files and select Live Connect.
3.At this point the WL Form is setup and ready.
4.Create a New Record.
5.When creating a Water Level record, the following fields are automatically filled based on the location associated with the record:
When using the BaroLogger Troll:
DATE_OF_DEPLOYMENT
BP_TIME_OF_CALIBRATION
BP_CURRENT
LOGGER_ID
When using the Weather Station:
BP_CURRENT
These values are based on the LIVE_LOGGER_REF (historical) field values:
•The real-time depth to water [DTW_REALTIME] value will auto-populate from Transducer in the WL Form [Waterlevel_v1].
•EDGE will calculate the corrected depth to water [CORRECTED_DTW] value based on the Baro Logger data (Ref. Equation 1 below).
•If no Baro Logger data exists, it will default to the real-time depth to water [DTW_REALTIME] value.
•Now enter the manual depth to water (ft) [WATER_LEVEL_DEPTH] value.
•Water Level Depth vs. Corrected Depth Check calculates the absolute difference value between the water level depth [WATER_LEVEL_DEPTH] and corrected depth to water [CORRECTED_DTW].
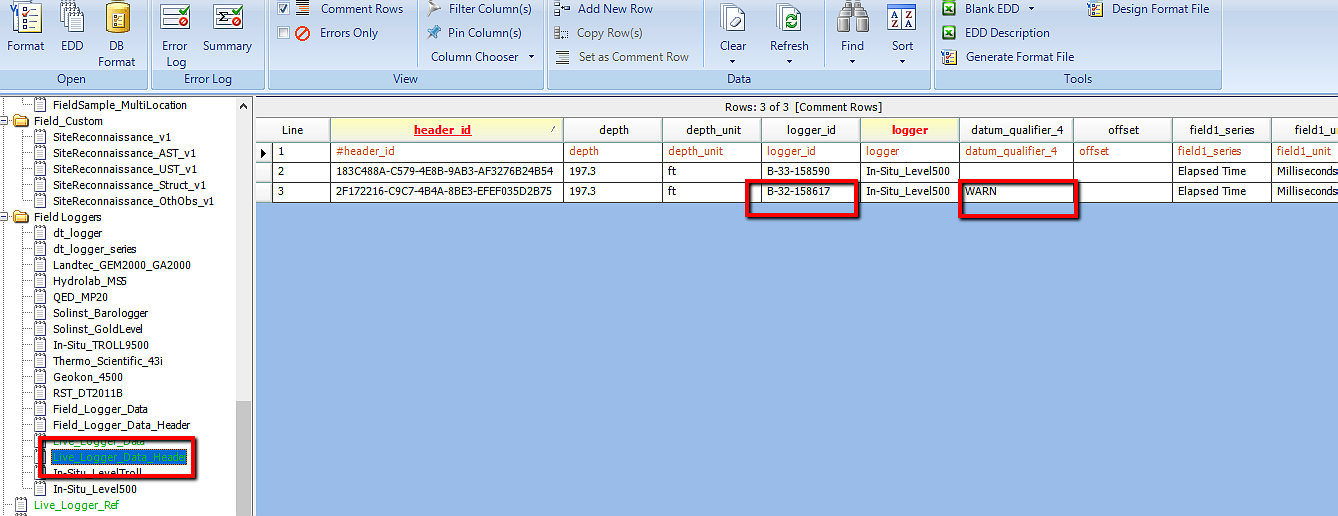
•If the absolute difference value is greater than the tolerance value, it will automatically flag and in the LIVE_LOGGER_DATA_HEADER field will show "WARN".
•If "WARN" is visible, no data from the location will be loaded to EDP.
•The tolerance value comes from the LIVE_LOGGER_REF value in the EDD created earlier. The user can set the tolerance value accordingly in the EDGE Field EDD Report.
6.Save the EDD as... (e.g., EDGE_Report_12345_complete.xlsx).
Calculations
Before proceeding, a conversion between feet and PSI is necessary, if corrected depth to water [CORRECTED_DTW] = DEPTH_UNIT is set to feet.
Note: 1 foot = 0.4329 PSI, and 1 PSI = 2.31 feet. |
Equation 1:
[CORRECTED_DTW] = [WATER_LEVEL_DEPTH] - [BP_TIME_OF_CALIBRATION] + [BP_CURRENT]
Equation 2:
abs = |[WATER_LEVEL_DEPTH] - [CORRECTED_DTW]|
Note: To match SYS_LOC_CODE in LIVE_LOGGER_REF tab, the value parameter needs to be setup to WS_BAROP. Condition for flagging series in LIVE_LOGGER_REF tab: The value parameter needs to be setup to FLAG_SERIES for value1, which is Level Depth To Water. |
Step 6. Commit to EQuIS Database
Note: This action is performed every time, after each field event. |
•Save the EDD and then load to EDP. For any field that has the warning "WARN" in the LIVE_LOGGER_DATA_HEADER field, the corresponding data will not show in the LIVE_LOGGER_DATA field.
•During the Create step in EDP, the groundwater elevation is calculated as per Equation 3 only if the depth to water exists. If "WARN" is in the DATUM_QUALIFIER_4 field, groundwater elevation will not be calculated.
Equation 3:
[Groundwater Elevation (corrected)] = [Well Measuring Point Elevation] - ([Transducer Depth to Water] – [Barometric Pressure at Time of Calibration (in feet)] + [Current Barometric Pressure (in feet)])
where
•[Well Measuring Point Elevation] and [Barometric Pressure at time of Calibration] is from LIVE_LOGGER_REF in EDD, based on the SYS_LOC_CODE.
•[Transducer Depth to Water] is from the current logger row.
•[Current Barometric Pressure (in feet)] is closest to the date.
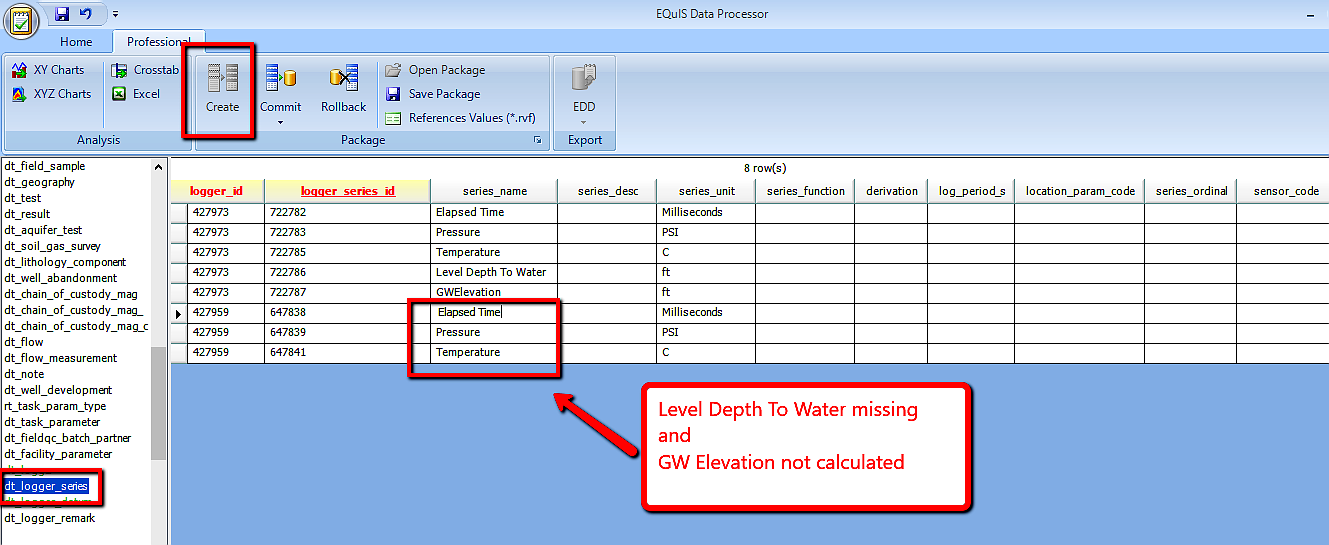
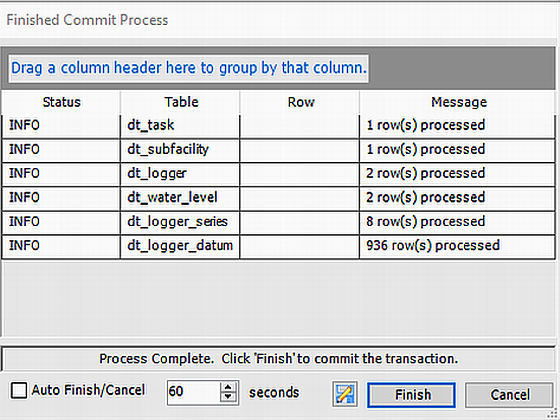
•Commit data to the database.
